# Table of Contents
# 스프링 시큐리티
스프링 시큐리티(Spring Security)는 인증 및 접근 제어를 제공하는 스프링 프레임워크 모듈이다. 보통 ID/Password 또는 Token 기반으로 인증을 진행하며, Role 또는 Authority로 접근 제어를 할 수 있다.
# 의존성 설정
Spring Security를 사용하기 위해서 다음 의존성을 추가한다.
// build.gradle
dependencies {
    // ...
    implementation 'org.springframework.boot:spring-boot-starter-web'
    implementation 'org.springframework.boot:spring-boot-starter-mustache'
    implementation 'org.springframework.boot:spring-boot-starter-security'
    testImplementation 'org.springframework.security:spring-security-test'
    testImplementation 'org.springframework.boot:spring-boot-starter-test'
}
예제를 위해 Mustache를 뷰 템플릿으로 설정해놨다.
# 스프링 시큐리티 동작 원리
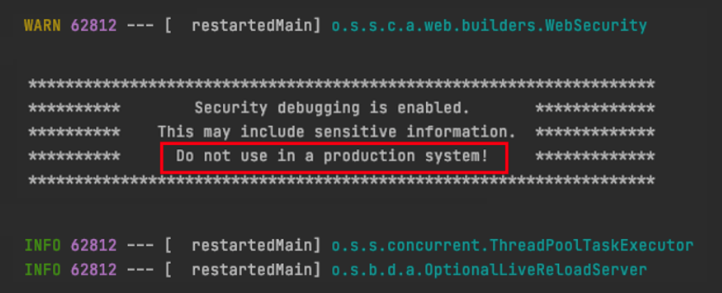
스프링 시큐리티는 여러 필터들의 묶음인 필터 체인으로 동작한다. @EnableWebSecurity(debug = true)로 설정하면 요청에 대해 동작하는 필터들을 확인할 수 있다.
@Configuration
@EnableWebSecurity(debug = true)
public class SecurityConfig extends WebSecurityConfigurerAdapter {
    // ...
}
다음과 같이 로그에 작동한 필터들이 출력된다.
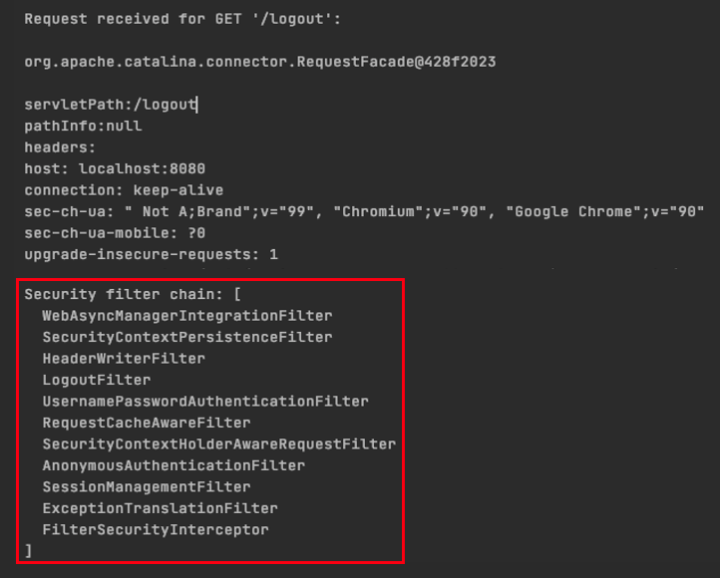
클라이언트로부터 요청이 들어오면 이 필터들을 거치면서 인증과 접근 권한을 체크한다.
폼 기반 ID/Password 인증의 경우 UsernamePasswordAuthenticationFilter에 도착하게된다. 이 필터는 먼저 ID와 Password로 Authentication의 구현체인 UsernamePasswordAuthenticationToken를 생성한다. 그 다음 AuthenticationManager.authenticate()를 호출한다.
public class UsernamePasswordAuthenticationFilter {
	@Override
	public Authentication attemptAuthentication(HttpServletRequest request, HttpServletResponse response) throws AuthenticationException {
		if (this.postOnly && !request.getMethod().equals("POST")) {
			throw new AuthenticationServiceException("Authentication method not supported: " + request.getMethod());
		}
		String username = obtainUsername(request);
		username = (username != null) ? username : "";
		username = username.trim();
		String password = obtainPassword(request);
		password = (password != null) ? password : "";
		UsernamePasswordAuthenticationToken authRequest = new UsernamePasswordAuthenticationToken(username, password);
		// Allow subclasses to set the "details" property
		setDetails(request, authRequest);
		return this.getAuthenticationManager().authenticate(authRequest);
	}
}
AuthenticationManager.authenticate()가 호출되면 AuthenticationManager는 AutehnticationProvider의 구현체를 사용하여 실질적인 인증을 진행한다. AutehnticationProvider의 구현체에는 ID/Password를 비교하는 실질적인 인증 로직이 포함되며, 디폴트 AuthenticationProvider는 UserDetailsService의 구현체로 인증을 진행한다. 따라서 보통 다음과 같이 UserDetailsService의 구현체를 구현하고 AuthenticationManager가 이 구현체를 사용하도록 설정한다.
@Service
@RequiredArgsConstructor
public class UserDetailsServiceImpl implements UserDetailsService {

    private final UserRepository userRepository;

    @Override
    public UserDetails loadUserByUsername(String username) throws UsernameNotFoundException {
        UserEntity user = userRepository.findOneByName(username)
                .orElseThrow(() -> new UsernameNotFoundException(username));

        return org.springframework.security.core.userdetails.User.builder()
                .username(user.getName())
                .password(user.getPassword())
                .authorities(new SimpleGrantedAuthority(user.getAuthority().getDescription()))
                .build();
    }
}
@Configuration
@EnableWebSecurity
@RequiredArgsConstructor
public class SecurityConfig extends WebSecurityConfigurerAdapter {

    private final UserDetailsServiceImpl userDetailsService;

    @Override
    protected void configure(AuthenticationManagerBuilder auth) throws Exception {
        auth.userDetailsService(userDetailsService)
                .passwordEncoder(passwordEncoder());
    }

    @Bean
    PasswordEncoder passwordEncoder() {
        return new BCryptPasswordEncoder();
    }

    // 생략 ...
}
인증에 성공하면 AuthenticationManager는 isAuthenticated()의 반환값이 true로 설정된 Authentication객체를 반환한다. UsernamePasswordAuthenticationFilter는 이 Authentication객체를 SecurityContext에 저장하게 된다. 따라서 소스코드에서 다음과 같이 인증 여부를 확인할 수 있게 된다.
SecurityContext securityContext = SecurityContextHolder.getContext();
Authentication authentication = context.getAuthentication();
if (authentication.isAuthenticated()) {
    // ..
} else {
    // ..
}
토큰 기반 인증의 경우 일반적으로 요청에 포함된 토큰을 UsernamePasswordAuthenticationFilter 이전에 가로채어 검증한다.
@Configuration
@EnableWebSecurity
@EnableGlobalMethodSecurity(prePostEnabled = true)
@RequiredArgsConstructor
public class SecurityConfig extends WebSecurityConfigurerAdapter {

    // ...

    @Override
    protected void configure(HttpSecurity http) throws Exception {
        http
            // ...
            .addFilterBefore(jwtFilter(), UsernamePasswordAuthenticationFilter.class)
                .exceptionHandling()
                .authenticationEntryPoint(jwtAuthenticationEntryPoint)
                .accessDeniedHandler(jwtAccessDeniedHandler).and()
            .authorizeRequests((authorize) -> {
                // ...
            });
    }

    @Bean
    JwtFilter jwtFilter() {
        return new JwtFilter(tokenProvider);
    }

    @Override
    protected void configure(AuthenticationManagerBuilder auth) throws Exception {
        auth
            .userDetailsService(userDetailsService)
            .passwordEncoder(passwordEncoder());
    }

    @Bean
    @Override
    public AuthenticationManager authenticationManagerBean() throws Exception {
        return super.authenticationManagerBean();
    }
}
토큰을 검증하는 필터는 직접 구현해야한다.
@Slf4j
public class JwtFilter extends OncePerRequestFilter {

    public static final String AUTHORIZATION_HEADER = "Authorization";

    private TokenProvider tokenProvider;

    public JwtFilter(TokenProvider tokenProvider) {
        this.tokenProvider = tokenProvider;
    }

    @Override
    protected void doFilterInternal(HttpServletRequest request, HttpServletResponse response, FilterChain filterChain) throws ServletException, IOException {
        String jwt = resolveToken(request);
        String requestURI = request.getRequestURI();

        if (StringUtils.hasText(jwt) && tokenProvider.validateToken(jwt)) {
            Authentication authentication = tokenProvider.getAuthentication(jwt);
            SecurityContextHolder.getContext().setAuthentication(authentication);
        } else {
            log.debug("No valid token.");
        }
        filterChain.doFilter(request, response);
    }

    private String resolveToken(HttpServletRequest request) {
        String bearerToken = request.getHeader(AUTHORIZATION_HEADER);
        if (StringUtils.hasText(bearerToken) && bearerToken.startsWith("Bearer ")) {
            return bearerToken.substring(7);
        }
        return null;
    }
}
또한 토큰과 Authentication을 제어하는 유틸리티 클래스도 필요하다.
@Component
@Slf4j
public class TokenProvider {

    @Value("${jwt.token.secret}")
    private String secret;

    @Value("${jwt.token.expire}")
    private long expireTimeInSeconds;

    private static final String AUTHORITIES_KEY = "auth";

    public String createToken(Authentication authentication) {
        String authorities = authentication.getAuthorities().stream()
                .map(GrantedAuthority::getAuthority)
                .collect(Collectors.joining(","));

        Date validity = Date.from(ZonedDateTime.now().plusMinutes(expireTimeInSeconds).toInstant());

        return Jwts.builder()
                .setSubject(authentication.getName())
                .claim(AUTHORITIES_KEY, authorities)
                .signWith(SignatureAlgorithm.HS256, secret.getBytes())
                .setExpiration(validity)
                .compact();
    }

    public boolean validateToken(String token) {
        try {
            Jwts.parser().setSigningKey(secret.getBytes(StandardCharsets.UTF_8)).parseClaimsJws(token);
            return true;
        } catch (SecurityException | MalformedJwtException e) {
            log.info("잘못된 JWT 서명입니다.");
        } catch (ExpiredJwtException e) {
            log.info("만료된 JWT 토큰입니다.");
        } catch (UnsupportedJwtException e) {
            log.info("지원되지 않는 JWT 토큰입니다.");
        } catch (IllegalArgumentException e) {
            log.info("JWT 토큰이 잘못되었습니다.");
        }
        return false;
    }

    public Authentication getAuthentication(String token) {

        Claims claims = Jwts.parser()
                .setSigningKey(secret.getBytes(StandardCharsets.UTF_8))
                .parseClaimsJws(token)
                .getBody();

        Collection<? extends GrantedAuthority> authorities =
                Arrays.stream(claims.get(AUTHORITIES_KEY).toString().split(","))
                        .map(SimpleGrantedAuthority::new)
                        .collect(Collectors.toList());

        User principal = new User(claims.getSubject(), "", authorities);

        return new UsernamePasswordAuthenticationToken(principal, token, authorities);
    }
인증에 성공했다면 접근을 제어할 차례다. 자원에 대한 접근은 Authority 또는 Role로 제어하며, 구성 클래스에서 HttpSecurity의 authorizeRequests()로 설정할 수 있다.
public class SecurityConfig extends WebSecurityConfigurerAdapter {

    // ...

    @Override
    protected void configure(HttpSecurity http) throws Exception {
        http
            // ...
            .authorizeRequests((authorize) -> {authorize
                .antMatchers("/member/**").authenticated()
                .antMatchers("/manager/**").hasAnyRole("MANAGER", "ADMIN")
                .antMatchers("/admin/**").hasRole("ADMIN")
                .anyRequest().authenticated()
            });
    }
물론 어노테이션으로도 접근을 제어할 수 있다.
@Configuration
@EnableWebSecurity
@EnableGlobalMethodSecurity(prePostEnabled = true, securedEnabled = true)
public class SecurityConfig extends WebSecurityConfigurerAdapter {
    /// ...
}
@RestController
@RequestMapping("/test")
public class TestController {

    @PreAuthorize("hasAnyAuthority('USER')")
    @GetMapping("/test1")
    public String test1(@AuthenticationPrincipal User user) {
        return "test1";
    }
}
# 스프링 시큐리티 구성 클래스
스프링 시큐리티와 관련된 설정을 커스터마이징하려면 구성 클래스를 정의해야한다. 구성 클래스는 WebSecurityConfigurerAdapter를 상속하며, @EnableWebSecurity어노테이션을 추가해야한다.
import org.springframework.security.config.annotation.web.builders.HttpSecurity;
import org.springframework.security.config.annotation.web.configuration.EnableWebSecurity;
import org.springframework.security.config.annotation.web.configuration.WebSecurityConfigurerAdapter;

@Configuration
@EnableWebSecurity
public class SecurityConfig extends WebSecurityConfigurerAdapter {
    // ...
}
이 구성 클래스에서 스프링 시큐리티와 관련된 설정을 커스터마이징 할 수 있다.
# SecurityContext
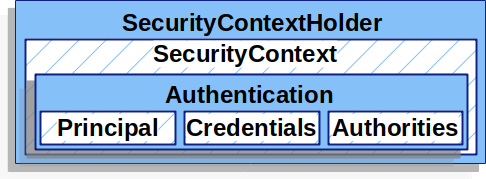
스프링 시큐리티는 인증, 접근 권한 등 보안과 관련된 정보를 유지하고 있다. SecurityContext 인터페이스를 사용하면 이 정보에 접근할 수 있다.
SecurityContext securityContext = SecurityContextHolder.getContext();
# Authentication
SecurityContext에는 현재 스레드에서 인증된 사용자에 대한 데이터를 Authentication 객체에 유지하고 있다.
SecurityContext context = SecurityContextHolder.getContext();
Authentication authentication = context.getAuthentication();
Authentication 객체에서 인증된 사용자에 대한 다양한 정보를 확인할 수 있다.
boolean authenticated = authentication.isAuthenticated();
String username = authentication.getName();
Object principal = authentication.getPrincipal();
Collection<? extends GrantedAuthority> authorities = authentication.getAuthorities();
Object credentials = authentication.getCredentials();
# SecurityContextHolder
SecurityContextHolder는 SecurityContext를 래핑하고 있다.
SecurityContextHolder는 SecurityContext와 스레드를 연결하는 역할을 한다. 좀 더 자세히 설명하자면 SecurityContextHolder를 통해 SecurityContext가 어떤 스레드에서 유효할지 설정할 수 있으며, 이를 전략(Strategy)라고 한다.
Strategy는 스프링 시큐리티 구성 클래스에서 다음과 같이 설정할 수 있다.
@Configuration
@EnableWebSecurity
public class SecurityConfig extends WebSecurityConfigurerAdapter {

    @Override
    protected void configure(HttpSecurity http) throws Exception {
        // ...
        SecurityContextHolder.setStrategyName(SecurityContextHolder.MODE_GLOBAL);
    }
}
가능한 설정 값은 다음과 같다.
MODE_THREADLOCAL: 현재 스레드에서만 SecurityContext를 공유한다.MODE_INHERITABLETHREADLOCAL: 현재 스레드와 하위 스레드에서 SecurityContext를 공유한다.MODE_GLOBAL: 모든 스레드가SecurityContext를 공유한다.
# 인증 절차 설정하기
WebSecurityConfigurerAdapter의 configure(HttpSecurity http)메소드를 오버라이드하여 인증 절차를 설정할 수 있다.
인증 방법을 커스터마이징하기 전에 디폴트 설정에 대해 알아볼 필요가 있다. 디폴트 설정은 다음과 같다.
public abstract class WebSecurityConfigurerAdapter {
	private void configure(HttpSecurity http) throws Exception {
		http
            .authorizeRequests()
                .anyRequest().authenticated().and()
		    .formLogin().and()
		    .httpBasic().and()
            .logout();
	}
}
authorizeRequests().anyRequest().authenticated(): 모든 요청에 대해서 인증을 요구한다.formLogin(): 폼 기반 인증을 활성화한다.httpBasic(): HTTP 기본 인증을 활성화한다.logout(): 로그아웃 기능을 지원한다.
폼 기반 인증(Form-based Authentication) (opens new window)은 다음과 같이 HTML Form 태그로 사용자를 인증하는 방식이다.
<form name="LoginForm" method="post" action="/auth/login">
  <input type="text" name="username"/>
  <input type="password" name="password"/>
</form>
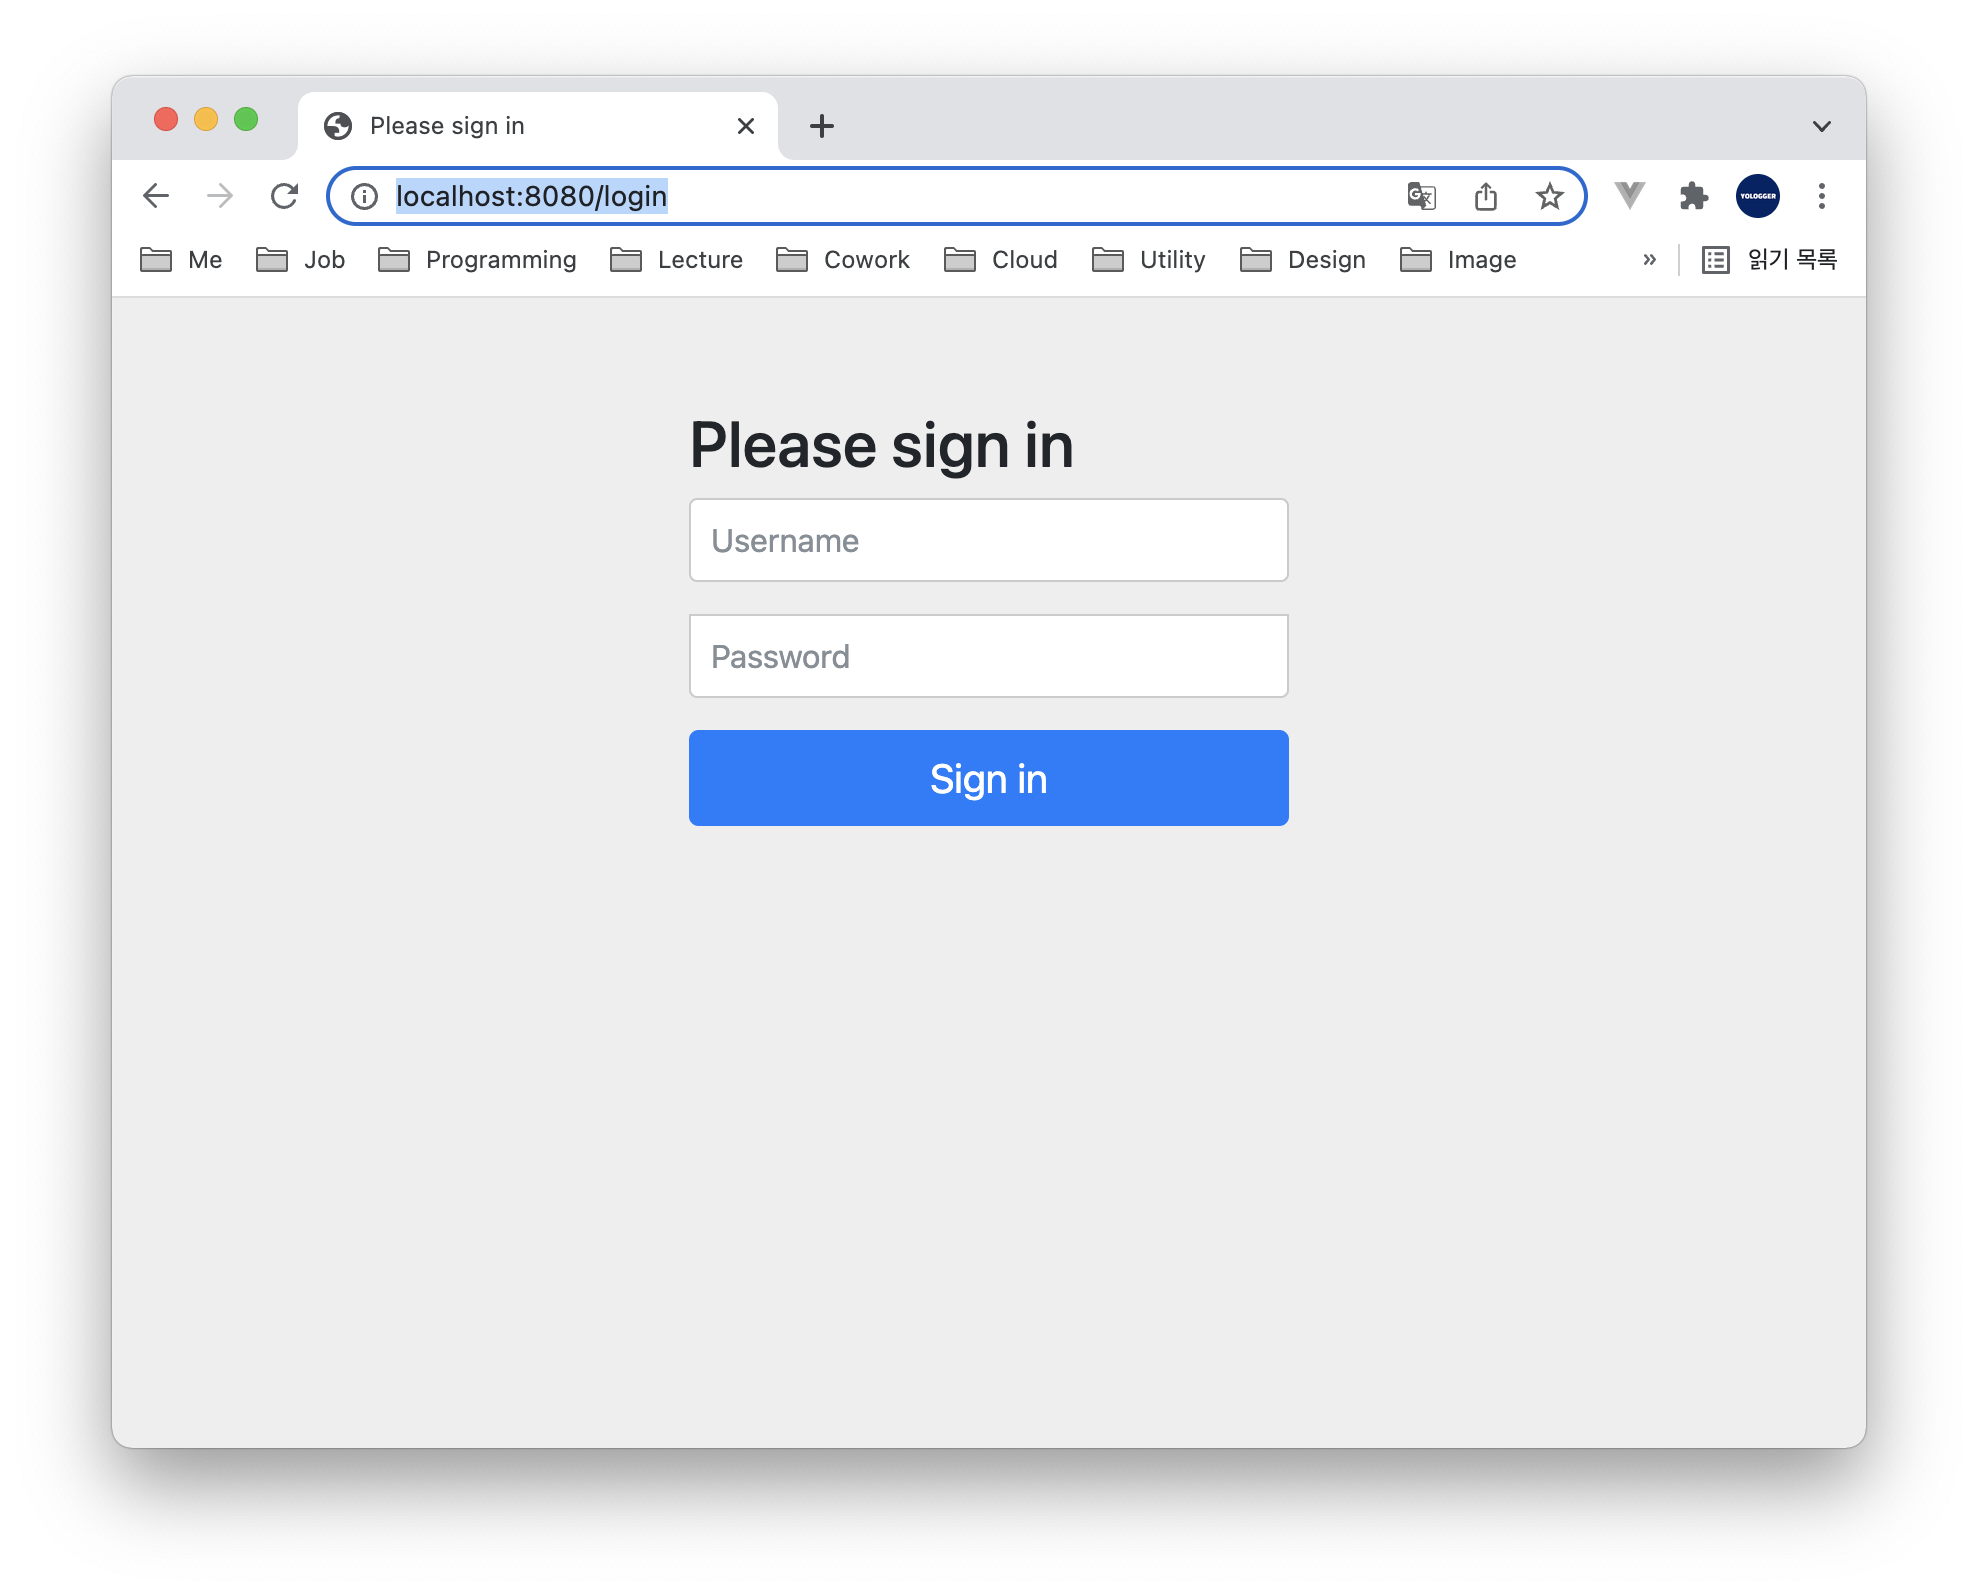
스프링 시큐리티는 기본 로그인 페이지를 제공한다.
물론 사용자가 직접 로그인 페이지를 정의할 수 있다.
public class SecurityConfig extends WebSecurityConfigurerAdapter {

    @Override
    protected void configure(HttpSecurity http) throws Exception {
        http
            .authorizeRequests()
                .anyRequest().authenticated().and()
            .formLogin()
                .loginPage("/login.html")  // 사용자 정의 로그인 페이지
            // ...
    }
}
그 외에도 다음과 같이 여러 설정을 커스터마이징할 수 있다.
public class SecurityConfig extends WebSecurityConfigurerAdapter {

    @Override
    protected void configure(HttpSecurity http) throws Exception {
        http
            .authorizeRequests()
                .anyRequest().authenticated().and()
            .formLogin()
                .loginPage("/login.mustache")  // 사용자 정의 로그인 페이지
                .defaultSuccessUrl("/home")  // 로그인 성공 후 이동 페이지
                .failureUrl("/login")  // 로그인 실패 후 이동 페이지
                .usernameParameter("userId")  // 아이디 파라미터명 설정
                .passwordParameter("passwd")  // 패스워드 파라미터명 설정
                .loginProcessingUrl("/login")  // 로그인 Form Action Url
                .successHandler(new AuthenticationSuccessHandler() {
                    // 로그인 성공 후 핸들러
                })
                .failureHandler(new AuthenticationFailureHandler() {
                    // 로그인 실패 후 핸들러
                }).and()
            // ...
    }
}
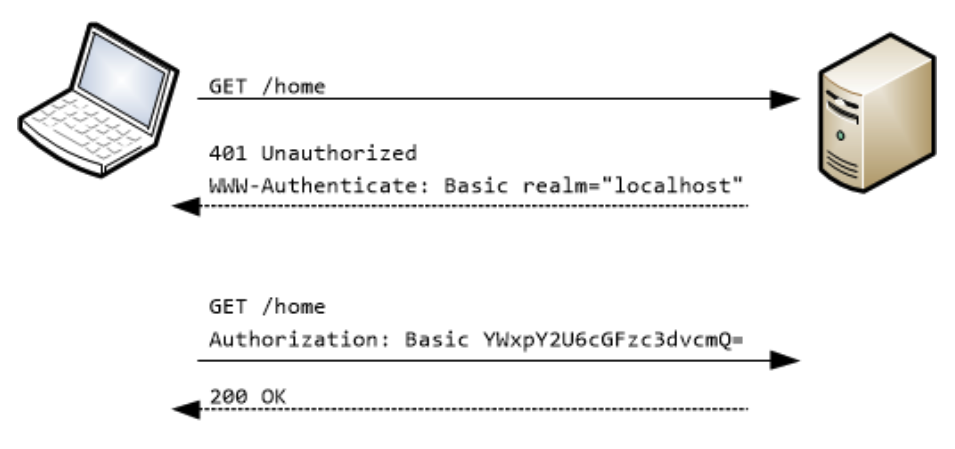
HTTP 기본 인증(Http basic authentication) (opens new window)은 다음 절차를 준수하는 인증 방법을 의미한다.
- 서버는 클라이언트의 인증이 실패했을 때
WWW-Authenticate헤더를 추가하여401(Unauthorized)응답을 보낸다. - 클라이언트는
Authorization헤더에 인코딩된 비밀번호를 추가하여 인증을 요청한다. - 인증이 완료되면 서버는
200(OK)응답을 보낸다.
HTTP 기본 인증은 HttpSecurity.httpBasic() 메소드로 활성화할 수 있다.
public abstract class WebSecurityConfigurerAdapter {
	private void configure(HttpSecurity http) throws Exception {
		http
            // ...
		    .httpBasic();
	}
}
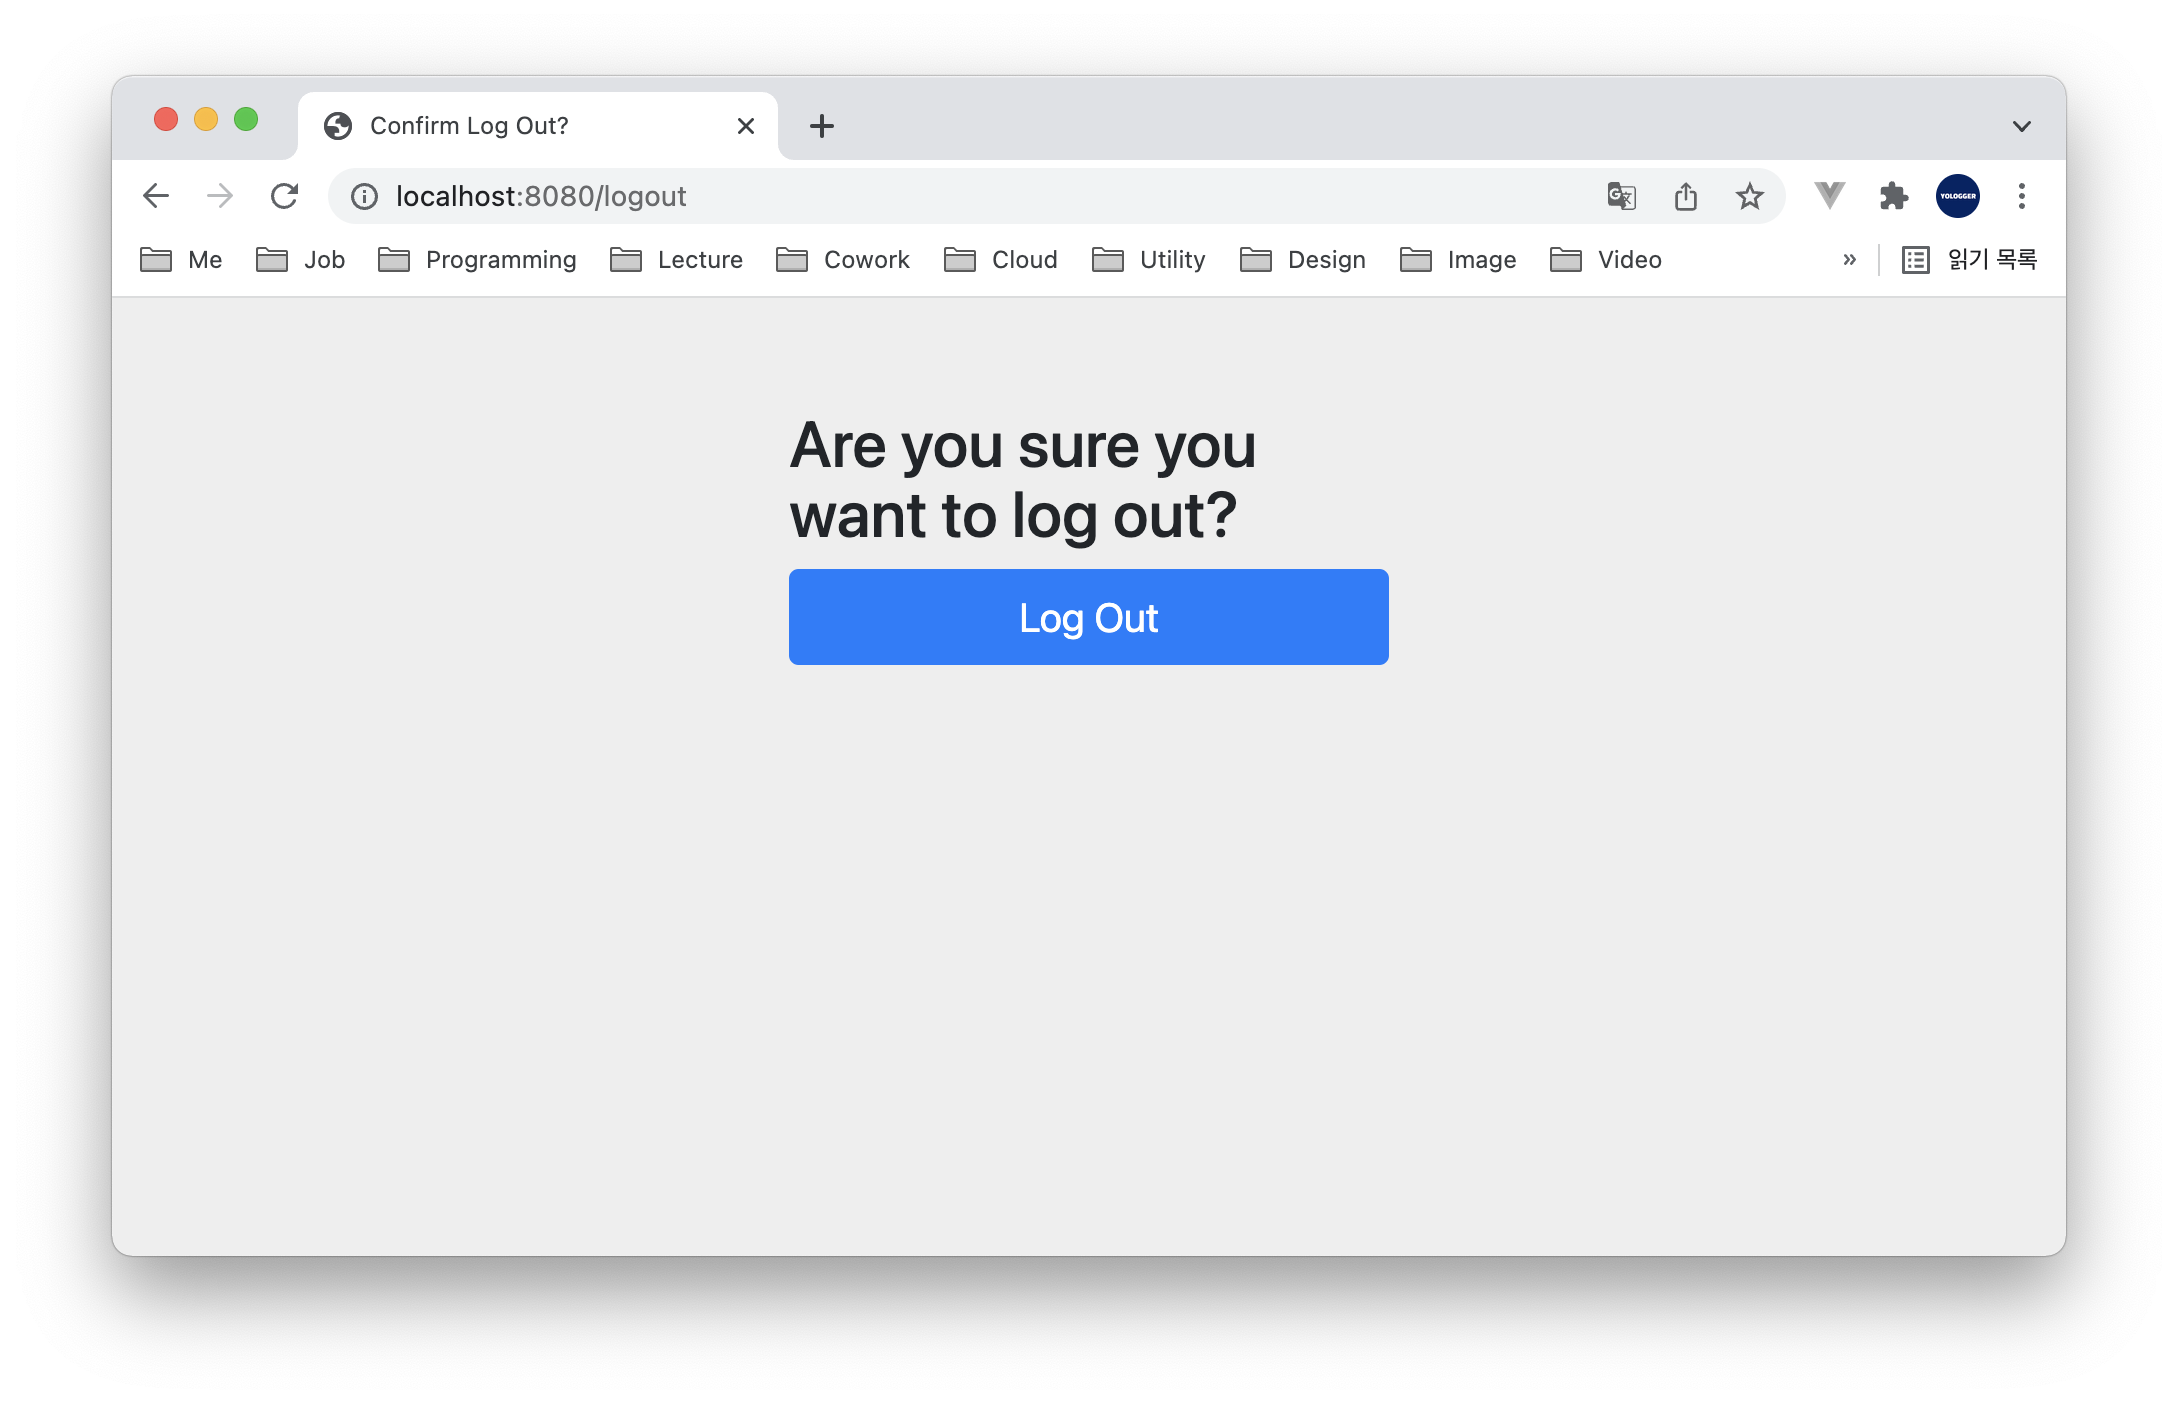
HttpSecurity.logout()은 기본 로그아웃 기능을 지원한다. 이 덕분에 /logout 경로로 이동하면 다음과 같이 기본 로그아웃 페이지에 접근할 수 있다.
물론 다음과 같이 로그아웃과 관련된 기능을 커스터마이징할 수도 있다.
public class SecurityConfig extends WebSecurityConfigurerAdapter {

    @Override
    protected void configure(HttpSecurity http) throws Exception {
        http
            // ...
            .logout()
                .logoutUrl("/auth/logout.mustache")
                .logoutSuccessUrl("/auth/login.mustache")
                .logoutSuccessHandler(...)
                .invalidateHttpSession(true)  // 서버 세션 삭제하기
                .deleteCookies("JSESSIONID").and()  // 클라이언트 쿠키 삭제하기
            // ...
    }
}
각 기능은 and() 대신 disable()을 사용하여 비활성화할 수 있다.
@Configuration
@EnableWebSecurity
public class SecurityConfig extends WebSecurityConfigurerAdapter {

    @Override
    protected void configure(HttpSecurity http) throws Exception {
        http
            .authorizeRequests()
                .anyRequest().authenticated().and()
            .formLogin().disable()
            .httpBasic().disable()
            .logout().disable();
    }
}
# BCryptPasswordEncoder
회원가입 또는 인증 시 비밀번호를 암호화할 필요가 있다. 이를 위해 스프링 시큐리티는 BCryptPasswordEncoder클래스를 제공한다. 이 객체는 다음과 같이 빈으로 등록하여 사용할 수 있다.
import org.springframework.security.crypto.bcrypt.BCryptPasswordEncoder;

@EnableWebSecurity
public class SecurityConfig extends WebSecurityConfigurerAdapter {

    @Bean
    PasswordEncoder passwordEncoder() {
        return new BCryptPasswordEncoder();
    }
}
# UserDetailsService, UserDetails, User
데이터베이스에서 사용자 정보를 가져와 인증을 진행할 때는 UserDetailsService인터페이스를 구현하고 loadUserByUsername()메소드를 오버라이드 해야한다.
@Service
@RequiredArgsConstructor
public class UserDetailsServiceImpl implements UserDetailsService {

    private final UserRepository userRepository;

    @Override
    public UserDetails loadUserByUsername(String username) throws UsernameNotFoundException {
        UserEntity user = userRepository.findOneByName(username)
                .orElseThrow(() -> new UsernameNotFoundException(username));

        return org.springframework.security.core.userdetails.User.builder()
                .username(user.getName())
                .password(user.getPassword())
                // .roles("USER")
                .authorities(new SimpleGrantedAuthority(user.getAuthority().getDescription()))
                .build();
    }
}
위 예제에서는 loadUserByUsername() 메소드의 반환값으로 org.springframework.security.core.userdetails.User클래스를 사용했다. 이 클래스 대신 데이터 클래스에서 org.springframework.security.core.userdetails.UserDetails인터페이스를 직접 구현할 수도 있다.
@Entity
@Table(name = "user")
@NoArgsConstructor
@Getter
public class UserEntity implements UserDetails {

}
이 경우 loadUserByUsername() 메소드에서 UserEntity를 바로 반환할 수도 있다.
import org.springframework.security.core.userdetails.User;
import org.springframework.security.core.userdetails.UserDetails;
import org.springframework.security.core.userdetails.UserDetailsService;

@Service
@RequiredArgsConstructor
public class UserDetailsServiceImpl implements UserDetailsService {

    private final UserRepositoryImpl userRepository;

    @Override
    public UserDetails loadUserByUsername(String username) throws UsernameNotFoundException {
        UserEntity userEntity = userRepository.findByEmail(username)
                .orElseThrow(() -> new UsernameNotFoundException("Username Not Found."));

        return userEntity;
    }
}
UserDetailsServiceImpl은 다음과 같이 등록할 수 있다.
@Configuration
@EnableWebSecurity
@RequiredArgsConstructor
public class SecurityConfig extends WebSecurityConfigurerAdapter {

    private final UserDetailsServiceImpl userDetailsService;

    // ...

    @Bean
    PasswordEncoder passwordEncoder() {
        return new BCryptPasswordEncoder();
    }

    @Override
    protected void configure(AuthenticationManagerBuilder auth) throws Exception {
        auth.userDetailsService(userDetailsService)
                .passwordEncoder(passwordEncoder());
    }
}
다음과 같은 방법으로도 등록할 수 있다.
@Configuration
@EnableWebSecurity
@RequiredArgsConstructor
public class SecurityConfig extends WebSecurityConfigurerAdapter {

    @Bean
    PasswordEncoder passwordEncoder() {
        return new BCryptPasswordEncoder();
    }

    @Override
    protected void configure(HttpSecurity http) throws Exception {
        http
            // ...
            .userDetailsService(userDetailsServiceImpl);
            // ...
    }
}
# Access Control
특정 자원에 권한이 있는 사용자만 접근할 수 있도록 하는 것을 접근 제어(Access Control)라고 한다. 스프링 시큐리티는 Access Control을 위해 권한(Authority)과 역할(Role)이라는 개념을 사용한다.
# Authority
권한(Authority)는 어떤 자원에 대해 접근할 수 있는 권한을 의미한다.
예를 들어 member 테이블에 대한 읽기, 쓰기, 삭제 권한은 다음과 같이 선언할 수 있다.
- AUTHORITY_READ_MEMBER
- AUTHORITY_WRITE_MEMBER
- AUTHORITY_DELETE_MEMBER
권한은 작명에 제한이 없으며, Privilege라는 용어를 사용하기도 한다.
- PRIVILEGE_READ_MEMBER
- PRIVILEGE_WRITE_MEMBER
- PRIVILEGE_DELETE_MEMBER
작명에 제한이 없기 때문에 다음과 같이 선언할 수도 있다.
- READ_MEMBER
- WRITE_MEMBER
- DELETE_MEMBER
Authority, Role 모두를 반드시 사용할 필요는 없으며, 비즈니스에 따라 적절하게 사용하면 된다.
# Role
역할(Role)은 관련있는 Authority를 묶어 하나의 권한처럼 관리할 수 있다. 예를 들어 일반 사용자 역할은 다음 권한을 포함할 수 있다.
- ROLE_USER
- AUTHORITY_READ_MEMBER
- AUTHORITY_WRITE_MEMBER
관리자 역할은 다음 권한을 포함할 수 있다.
- ROLE_ADMIN
- AUTHORITY_READ_MEMBER
- AUTHORITY_WRITE_MEMBER
- PRIVILEGE_DELETE_MEMBER
Role의 이름은 반드시 ROLE_로 시작해야한다.
# Authority와 Role을 고려한 엔티티 설계
사용자와 관련된 엔티티 클래스는 다음과 같다.
@Entity
@Table(name = "user")
@NoArgsConstructor
@Getter
public class UserEntity {

    @Id
    @Column(name="id")
    @GeneratedValue(strategy = GenerationType.IDENTITY)
    private Long id;

    @Column(length = 200, nullable = false, unique = true)
    private String email;

    @Column(nullable = false)
    private String password;

    @ManyToMany
    @JoinTable(
            name = "user_role",
            joinColumns = @JoinColumn(name = "user_id", referencedColumnName = "id"),
            inverseJoinColumns = @JoinColumn(name = "role_id", referencedColumnName = "id")
    )
    private Set<RoleEntity> roles = new HashSet<RoleEntity>();

    @Builder
    public UserEntity(String email, String password, Collection<RoleEntity> roles) {
        this.email = email;
        this.password = password;
        this.roles.addAll(roles);
    }
}
public interface UserRepository extends JpaRepository<UserEntity, Long> {
}
역할(Role)과 관렫된 클래스는 다음과 같다.
public enum RoleEnum {

    ADMIN("ADMIN"),
    USER("USER");

    private String description;

    RoleEnum(String description) {
        this.description = description;
    }
}
@Entity
@Table(name = "role")
@Getter
@NoArgsConstructor
public class RoleEntity {

    @Id
    @Column(name="id")
    @GeneratedValue(strategy = GenerationType.IDENTITY)
    private Long id;

    @Enumerated(EnumType.STRING)
    private RoleEnum role;

    @ManyToMany(mappedBy = "roles")
    private Set<UserEntity> users = new HashSet<UserEntity>();

    @ManyToMany
    @JoinTable(
            name = "role_authority",
            joinColumns = @JoinColumn(name = "role_id", referencedColumnName = "id"),
            inverseJoinColumns = @JoinColumn(name = "authority_id", referencedColumnName = "id")
    )
    private Set<AuthorityEntity> authorities = new HashSet<AuthorityEntity>();

    @Builder
    public RoleEntity(RoleEnum role, Collection<AuthorityEntity> authorities) {
        this.role = role;
        this.authorities.addAll(authorities);
    }
}
public interface RoleRepository extends JpaRepository<RoleEntity, Long> {
    public RoleEntity findByRole(RoleEnum role);
}
권한(Authority)과 관련된 클래스는 다음과 같다.
public enum AuthorityEnum {

    CREATE_USER("CREATE_USER"),
    UPDATE_USER("UPDATE_USER"),
    DELETE_USER("DELETE_USER");

    private String description;

    AuthorityEnum(String description) {
        this.description = description;
    }
}
@Entity
@Table(name = "authority")
@Getter
@NoArgsConstructor
public class AuthorityEntity {

    @Id
    @Column(name="id")
    @GeneratedValue(strategy = GenerationType.IDENTITY)
    private Long id;

    private AuthorityEnum authority;

    @ManyToMany(mappedBy = "authorities")
    private Set<RoleEntity> roles = new HashSet<RoleEntity>();

    @Builder
    public AuthorityEntity(AuthorityEnum authority) {
        this.authority = authority;
    }
}
public interface AuthorityRepository extends JpaRepository<AuthorityEntity, Long> {
    public AuthorityEntity findByAuthority(AuthorityEnum authority);
}
사용자 추가를 위한 테스트 코드는 다음과 같다.
@DataJpaTest
class UserRepositoryTest {

    @Autowired
    private AuthorityRepository authorityRepository;

    @Autowired
    private RoleRepository roleRepository;

    @BeforeEach
    public void setUp() {
        // 어플리케이션에서 필요로하는 Authority 먼저 생성
        AuthorityEntity authority = AuthorityEntity.builder()
                .authority(AuthorityEnum.CREATE_USER)
                .build();
        authorityRepository.save(authority);

        // 어플리케이션에서 필요로하는 Role 먼저 생성
        RoleEntity role = RoleEntity.builder()
                .role(RoleEnum.USER)
                .authorities(Arrays.asList(authority))
                .build();
        roleRepository.save(role);
    }

    @Autowired
    private UserRepository userRepository;

    @Test
    public void test() {
        RoleEntity role = roleRepository.findByRole(RoleEnum.USER);

        UserEntity user = UserEntity.builder()
                .email("paul@gmail.com")
                .password("1234")
                .roles(Arrays.asList(role))
                .build();

        userRepository.save(user);

        List<UserEntity> users = userRepository.findAll();
        assertThat(users.size()).isEqualTo(1);
    }
}
# 접근 제어 설정하기
접근 제어는 구성 클래스의 configure(HttpSecurity http)메소드에서 HttpSecurity.authorizeRequests() 메소드로 설정한다.
모든 요청에 대해 자유로운 접근 권한을 부여하려면 anyRequest()와 permitAll()을 사용하면 된다.
@EnableWebSecurity
public class WebSecurityConfig extends WebSecurityConfigurerAdapter {

    @Override
	protected void configure(HttpSecurity http) throws Exception {
		http
			.authorizeRequests()
				.anyRequest().permitAll();
	}
}
모든 요청에 대해 인증을 요구할 때는 authenticated()를 사용한다.
@EnableWebSecurity
public class WebSecurityConfig extends WebSecurityConfigurerAdapter {

    @Override
	protected void configure(HttpSecurity http) throws Exception {
		http
			.authorizeRequests()
				.anyRequest().authenticated();
	}
}
특정 URL에 대해서만 접근 제어를 적용할 수 있다. 이 때는 antMatchers()를 사용한다.
@EnableWebSecurity
public class WebSecurityConfig extends WebSecurityConfigurerAdapter {

    @Override
	protected void configure(HttpSecurity http) throws Exception {
		http
			.authorizeRequests()
				.antMatchers("/join", "/login").permitAll();
	}
}
다음과 같이 URL에 따라 다른 접근 제어를 적용할 수 있다.
@EnableWebSecurity
public class WebSecurityConfig extends WebSecurityConfigurerAdapter {

    @Override
	protected void configure(HttpSecurity http) throws Exception {
		http
			.authorizeRequests()
				.antMatchers("/join", "/login").permitAll()
				.anyRequest().authenticated()
	}
}
와일드 카드를 사용할 수도 있다.
@RequiredArgsConstructor
@EnableWebSecurity
public class SecurityConfig extends WebSecurityConfigurerAdapter {

    private final UserDetailsServiceImpl userDetailsService;

    @Override
    protected void configure(HttpSecurity http) throws Exception {
        http
        .csrf().disable();
        .authorizeRequests(authorize -> authorize
            .antMatchers("/member/**").authenticated()
            .antMatchers("/manager/**").hasAnyRole("MANAGER", "ADMIN")
            .antMatchers("/admin/**").hasRole("ADMIN")
            .anyRequest().authenticated()
        )
        // ...
    }
}
Authority에 따른 접근 제어를 할 수도 있다.
@EnableWebSecurity
public class WebSecurityConfig extends WebSecurityConfigurerAdapter {

    @Override
	protected void configure(HttpSecurity http) throws Exception {
		http
            .authorizeRequests()
                .antMatchers("/post").hasAuthority("AUTHORITY_WRITE_POST")
                .antMatchers("/member").hasAnyAuthority("AUTHORITY_READ_MEMBER", "AUTHORITY_WRITE_MEMBER");
	}
}
Role에 따른 접근 제어도 가능하다.
@EnableWebSecurity
public class WebSecurityConfig extends WebSecurityConfigurerAdapter {

    @Override
	protected void configure(HttpSecurity http) throws Exception {
		http
            .authorizeRequests()
                .antMatchers("/admin").hasRole("ADMIN")
                .antMatchers("/member").hasAnyRole("MEMBER", "USER");
	}
}
hasRole() 또는 hasAnyRole()의 인자에 Role을 전달할 때는 문자열 ROLE_을 붙이지 않아야 한다.
# 어노테이션으로 접근 권한 제어하기
지금까지는 스프링 시큐리티 구성 파일의 configure(HttpSecurity http)로 접근 제어를 설정했다.
@EnableWebSecurity
public class WebSecurityConfig extends WebSecurityConfigurerAdapter {

    @Override
	protected void configure(HttpSecurity http) throws Exception {
		http
			.authorizeRequests()
				.antMatchers("/join", "/login").permitAll();
	}
}
스프링 시큐리티는 클래스나 메소드에 어노테이션을 붙여 접근을 제어할 수도 있다.
# @Secured
@Secured 어노테이션으로 특정 역할을 가진 사용자만 접근할 수 있도록 제어할 수 있다.
import org.springframework.security.access.annotation.Secured;

@RestController
@RequestMapping("/test")
public class TestController {

    @Secured({"ROLE_USER"})
    @GetMapping("/test1")
    public String test1() {
        return "test1";
    }
}
@Secured를 활성화하려면 시큐리티 설정 클래스에 @EnableGlobalMethodSecurity을 붙인 후 securedEnabled 속성을 true로 설정해야한다.
import org.springframework.security.config.annotation.method.configuration.EnableGlobalMethodSecurity;

@Configuration
@EnableWebSecurity
@EnableGlobalMethodSecurity(securedEnabled = true)
public class SecurityConfig extends WebSecurityConfigurerAdapter {

    @Override
    protected void configure(HttpSecurity http) throws Exception {
        http
            .authorizeRequests()
                .anyRequest().authenticated().and()
            .formLogin().and()
            .httpBasic().and()
            .logout();
    }
}
테스트 코드를 작성해보자.
@WebMvcTest
class TestControllerTest {

    @Autowired
    private MockMvc mvc;

    @Test
    @WithMockUser(roles = "USER")
    public void test() throws Exception {
        mvc.perform(get("/test/test1"))
                .andExpect(content().string("test1"));

    }
}
# @PreAuthorize
@PreAuthorize을 사용하면 SPEL이라는 표현식을 사용하여 더욱 정교하게 접근을 제어할 수 있다. @PreAuthorize는 어노테이션이 붙은 메소드를 실행하기 전에 인증을 진행한다.
import org.springframework.security.access.prepost.PreAuthorize;

@RestController
@RequestMapping("/test")
public class TestController {

    @PreAuthorize("isAuthenticated() and hasRole('ROLE_USER')")
    @GetMapping("/test1")
    public String test1() {
        return "test1";
    }
}
이 어노테이션을 활성화하려면 @EnableGlobalMethodSecurity의 prePostEnabled속성를 true로 설정해야한다.
@Configuration
@EnableWebSecurity
@EnableGlobalMethodSecurity(prePostEnabled = true)
public class SecurityConfig extends WebSecurityConfigurerAdapter {

    @Override
    protected void configure(HttpSecurity http) throws Exception {
        http
            .authorizeRequests()
                .anyRequest().authenticated().and()
            .formLogin().and()
            .httpBasic().and()
            .logout();
    }
}
인증에 성공한 경우 다음과 같이 메소드의 파라미터로 인증 정보를 바인딩할 수 있다. 바인딩되는 데이터의 타입은 UserDetails인터페이스 또는 User구현체다.
import org.springframework.security.core.annotation.AuthenticationPrincipal;
import org.springframework.security.core.userdetails.User;
import org.springframework.security.core.userdetails.UserDetails;

@RestController
@RequestMapping("/test")
public class TestController {

    @PreAuthorize("isAuthenticated() and hasRole('ROLE_USER')")
    @GetMapping("/test1")
    public String test1(@AuthenticationPrincipal User user) {
        return "test1";
    }
}
SPEL 표현식과 관련된 자세한 내용은 이 곳 (opens new window)에서 확인할 수 있다.
# @PostAuthorized
@PostAuthorized는 이 어노테이션이 붙은 메소드가 실행된 후에 인증을 시도한다.
# @AuthenticationPrincipal
인증된 사용자에 대한 정보는 @AuthenticationPrincipal 어노테이션과 User 객체로 바인딩할 수 있다.
import org.springframework.security.core.annotation.AuthenticationPrincipal;
import org.springframework.security.core.userdetails.User;
import org.springframework.security.core.userdetails.UserDetails;

@RestController
@RequestMapping("/test")
public class TestController {

    @GetMapping("/test1")
    public String test1(@AuthenticationPrincipal User user) {
        return "test1";
    }
}
# HttpSecurity vs. WebSecurity
스프링 시큐리티는 HttpSecurity로 인증 및 접근 제어 등을 설정한다.
import org.springframework.security.config.annotation.web.builders.HttpSecurity;
import org.springframework.security.config.annotation.web.configuration.EnableWebSecurity;
import org.springframework.security.config.annotation.web.configuration.WebSecurityConfigurerAdapter;

@EnableWebSecurity
public class SecurityConfig extends WebSecurityConfigurerAdapter {

    @Override
    public void configure(WebSecurity web) throws Exception {
        super.configure(web);
    }

    @Override
    protected void configure(HttpSecurity http) throws Exception {
        http
            .authorizeHttpRequests((authorize) -> authorize
                .antMatchers("/test1").hasAuthority("USER")
                .anyRequest().authenticated());
    }
}
HttpSecurity의 설정에 따라 여러 필터들로 구성된 필터 체인이 동작하여 인증 및 접근 권한을 체크하게 된다.
Security filter chain: [
  DisableEncodeUrlFilter
  WebAsyncManagerIntegrationFilter
  SecurityContextPersistenceFilter
  HeaderWriterFilter
  CsrfFilter
  LogoutFilter
  RequestCacheAwareFilter
  SecurityContextHolderAwareRequestFilter
  AnonymousAuthenticationFilter
  SessionManagementFilter
  ExceptionTranslationFilter
  AuthorizationFilter
]
WebSecurity는 필터 체인을 무시하는데 사용한다. 따라서 WebSecurity.ignoring().antMatchers()에 명시한 엔드 포인트는 HttpSecurity에서 설정한 인증 및 접근 권한 확인을 건너뛰게 된다.
@EnableWebSecurity
public class SecurityConfig extends WebSecurityConfigurerAdapter {

    @Override
    public void configure(WebSecurity web) throws Exception {
        web.ignoring()
                .antMatchers("/test1");
    }

    @Override
    protected void configure(HttpSecurity http) throws Exception {
        http
                .authorizeHttpRequests((authorize) -> authorize
                        .antMatchers("/test1").hasAuthority("USER") // 무시
                        .anyRequest().authenticated());
    }
}
위 예제처럼 WebSecurity, HttpSecurity를 모두 설정한 경우 WebSecurity가 HttpSecurity보다 우선하기 때문에 HttpSecurity의 인가 설정은 무시된다.
보통 HttpSecurity를 통해 인증 및 접근 제어을 설정한다. 그리고 WebSecurity로 정적 리소스 처럼 인증, 인가가 필요하지 않은 엔드포인트를 설정한다.
@EnableWebSecurity
public class SecurityConfig extends WebSecurityConfigurerAdapter {

    @Override
    public void configure(WebSecurity web) throws Exception {
        web.ignoring()
            .antMatchers("/publics/**");
    }

    @Override
    protected void configure(HttpSecurity http) throws Exception {
        http
            .authorizeHttpRequests((authorize) -> authorize
                .anyRequest().authenticated());
    }
}